A lot of people have no clue what’s going on with headsets. There’s no problem in not knowing, the problem comes when they need to set up a headset, or someone asks them about a headset issue. This won’t explain every headset issue out there, but you should be able to assemble one after this guide.
I’d like to make a quick disclaimer here. This guide does NOT involve dealing with gyro plates. However, they’re pretty simple to understand where they go anyway, so you should be able to work it out.
Now up to nitty gritty. Yes, I used that phrase. First off, I would like to show this image. This image labels all the parts of a headset – Generally. This shows the upper end of one, the bottom bearing is simple and can be explained in words and I’ll get to that after.
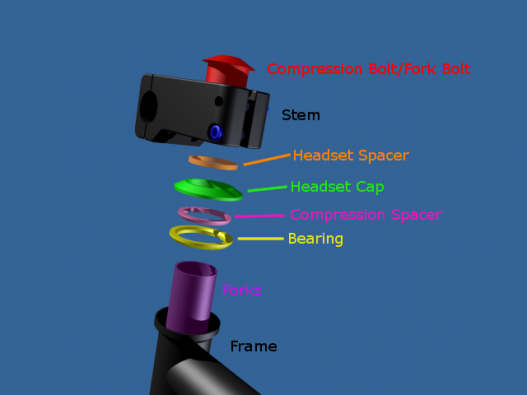
As you can see, all the parts are labeled. Those are the parts that you should have in your headset, and the order of assembly. They can be any color you want, but I thought the colors would help differentiate the parts.
I would also like to make a quick note that the orange headset spacer isn’t a necessity. It is possible to run your headset without one, or run it with several. The restriction is the height of the steerer tube, which is shown correctly here:
I would also like to make a quick note that the orange headset spacer isn’t a necessity. It is possible to run your headset without one, or run it with several. The restriction is the height of the steerer tube, which is shown correctly here:
You are supposed to have a FEW millimeters for error, and to allow the bearings to be compressed. If your fork bolt bottoms out and can’t compress the bearings to where they need to be, your headset could destroy itself when you ride.
I know this is crappy quality, and I can’t really help that, with the video production of inventor and the size is horrible because of the gif generator I used, however I hope to find a solution to both in the future, but for now:
I know this is crappy quality, and I can’t really help that, with the video production of inventor and the size is horrible because of the gif generator I used, however I hope to find a solution to both in the future, but for now:
Well, that’s about it. That’s it for as far as the order of assembly. Now there’s the process of assembling it. It seems very easy, and it is, but it’s confusing at first.
*Most of the new forks coming out are being modified with a crown race integrated directly on to them. If your forks have this, then ignore the crown race, and just put your bearing on.
Installing the crown race is really simple. Place it over the lip/expanded section of your fork, and hit it on using a hammer and a piece of wood, or a rubber mallet.
FAQ:
Q: My headset is loose. I followed the directions, and it's still loose. What's wrong?
A: My guess would be that your headset compression cap is bottoming out. This means that the bolt reaches the top of the forks and stops compressing the headset before the headset is fully compressed to where it needs to be. The solution to this is to simply add a headset spacer.
Q: Is my headset Cane Creek or Campy? OR Which headset do I need, Cane Creek or Campy spec?
A: As a psychic, I am going to tell you that it is campy spec. No, not really, however the MAJORITY of headsets/frames use a campy spec bearing in BMX. There is really no difference in performance, however the bearings form different angles. If you have any concerns, however, about your frame using one type or the other, contact the manufacturer of the frame.
Q: My frame uses a standard headset. What is that?
A: Simple. There are two types of headsets in BMX (basically). the first one is standard. It isn't really being used anymore, however some older frames use it, and still some new frames do use it as well. The other is an integrated headset. The difference is in the name. Standard headsets use bearing cups, integrated headsets have the cups integrated into the frame. If you have a standard headset/frame, you will need to place bearing cups into your frame before the bearings, but after that, the assembly is usually the same.
To install them, use some sort of bearing press. My next article will probably be about these (Bearing Presses).
Q: Your bearings are yellow and a solid piece of metal. Mine are....not?
A: Well I would hope not. The drawings/simulations above are mockups. The bearing is a simple illustration of the general shape of it ;). Not going to lie, I'm not even sure they're the right specs for dimensions. However, they are close/very close, so you can see what they do. Also the colors are just to help show one part different from the next, and keep the guide in check so you know what part is being referred to by the color of the words.
If you have any questions, please leave them in the comments and I will address them ASAP.
Thanks for reading/using this as a guide!
- Grease: Grease the bearings. Even if they are sealed, grease the surfaces where metal meets metal. Put a thin (but at the same time not too thin) layer of grease around the bearing cup in the frame, and on the outer race (outside) of the bearing as well.
- Place the bearing in the frame.
- Compression Spacer: Place the compression spacer above the bearing, facing downward as in the picture above. This keeps the forks seated correctly in the center of the bearing.
- Headset Cap: Place the headset cap on. The fit might be a little tight, but that's because it's supposed to try to seal up the headset and keep dirt from getting inside.
*As a side note. SOME headsets have the compression spacer integrated in to the headset cap. - Headset Spacer: If you have any, put them on. Also at this stage is when a gyro plate would be installed.
- Stem: Place the stem on the assembly as well. At this stage, DO NOT tighten the pinch bolts in the rear, and do not worry about lining up the stem straight with the forks.
- Headset Bolt/Compression Cap: Thread this on. Now, here's where it gets tricky. Putting it on isn't as easy as thread it in and finish. Now, when you tighten this up, this is what sets the compression of the bearings. If you put it too tight, you can crush the bearings. Ifyou put it too loose, you can destroy the bearings. Do NOT sit on the bike when you do this, instead be standing around it/over it, etc. The bike can stay on the ground, you don't need to have it lifted. Now tighten the cap to where you think it should be. Test that the bars can be spun without resistance, and the forks cannot wobble*. If BOTH of those criteria are met, you're good to go to the next step. If not, retry. It's tedious when you first do it, but after you do it a few times, you get used to it.
*When you're checking, a quick tip is to tighten up one of the stems pinch bolts a little bit, so that the stem won't wobble, tricking you to think that it's the fork wobbling, and to hold the stem from revolving on the forks.
**When you do this, keep in mind that it's not always going to be the same force/tension on your setup from time to time, or the same from one bike to the next. Always be ready to check. - Pinch Bolts: These go as tight as you can make them, within reason. These stop the stem from moving around when you ride, so make them tight. At the same time though, when you wipe out, your stem takes a huge impact. If your stem doesn't have that ability to fail and rotate, the bars can snap instead of the stem spinning, and needing to be reset. Instead of worrying about that though, just tighten your stem up. When you do this though, tighten both bolts at the same time, alternating 1/2 turns or 1/4 turns of the bolt. This keeps even pressure throughout the installation.
*Just as a quick info, when you do any type of dual pinch bolts, you should use this method of alternating turns.
**This is the ONLY step that depends on your stem. If your stem uses an alternative style of clamping the forks (IE: Eastern Deceptikon, Odyssey Elementary, Kink Relief, etc), then you should know about it and be able to figure it out. Steps 1-7 are a general rule that apply to nearly all headsets.
*Most of the new forks coming out are being modified with a crown race integrated directly on to them. If your forks have this, then ignore the crown race, and just put your bearing on.
Installing the crown race is really simple. Place it over the lip/expanded section of your fork, and hit it on using a hammer and a piece of wood, or a rubber mallet.
FAQ:
Q: My headset is loose. I followed the directions, and it's still loose. What's wrong?
A: My guess would be that your headset compression cap is bottoming out. This means that the bolt reaches the top of the forks and stops compressing the headset before the headset is fully compressed to where it needs to be. The solution to this is to simply add a headset spacer.
Q: Is my headset Cane Creek or Campy? OR Which headset do I need, Cane Creek or Campy spec?
A: As a psychic, I am going to tell you that it is campy spec. No, not really, however the MAJORITY of headsets/frames use a campy spec bearing in BMX. There is really no difference in performance, however the bearings form different angles. If you have any concerns, however, about your frame using one type or the other, contact the manufacturer of the frame.
Q: My frame uses a standard headset. What is that?
A: Simple. There are two types of headsets in BMX (basically). the first one is standard. It isn't really being used anymore, however some older frames use it, and still some new frames do use it as well. The other is an integrated headset. The difference is in the name. Standard headsets use bearing cups, integrated headsets have the cups integrated into the frame. If you have a standard headset/frame, you will need to place bearing cups into your frame before the bearings, but after that, the assembly is usually the same.
To install them, use some sort of bearing press. My next article will probably be about these (Bearing Presses).
Q: Your bearings are yellow and a solid piece of metal. Mine are....not?
A: Well I would hope not. The drawings/simulations above are mockups. The bearing is a simple illustration of the general shape of it ;). Not going to lie, I'm not even sure they're the right specs for dimensions. However, they are close/very close, so you can see what they do. Also the colors are just to help show one part different from the next, and keep the guide in check so you know what part is being referred to by the color of the words.
If you have any questions, please leave them in the comments and I will address them ASAP.
Thanks for reading/using this as a guide!
 RSS Feed
