Download this guide as PDF:
| wheel_building_guide_pdf.pdf |
This is a guide that I believe is way overdue for me on this site. I’ve made a few guides like this before for forums. I could easily recycle those guides, but I decided to make another one.
Just as a disclaimer, please do not expect to get this right on the very first try. My first time building a wheel I took a compilation of 3 different guides/how-to’s, 1.5 hours, and 4 tries. I’m hoping this guide at least takes care of needing more than 1.
Before I go through this guide, I want to define a few words that I might toss out there.
1 – Wheel – A complete assembly on a bike
2 – Rim – The outer part of a rim which the tire sits on
3 – Hub – Central part of a wheel
4 – Flange – The disk on the side of the hub that has holes drilled for spokes (attached permanently to hub)
5 – Nipple – Yeah, giggle a little bit. The technical term for the nut on the end of the spoke that holds it onto the rim.
6 – #h – The # sign stands for any number that can be put there, and the number stands for how many holes there are for spokes in total, #/2 on each side.
7 – #x/#cross – The # corresponds to how many times the spokes cross over each other in lacing.
Alright, to get down to things. Below is a numbered picture with the main parts you need for a wheel build.

1- Hub
2- Spokes
3- Nipples (They’re in a case, sorry, camera flash distorted it)
4- Rim
5- Spoke Wrench
2- Spokes
3- Nipples (They’re in a case, sorry, camera flash distorted it)
4- Rim
5- Spoke Wrench
A few notes. The nipples are crazy little buggers, and they’ll get away from you if they aren’t contained. So, keep them in a container. Doesn’t need to be eccentric.
Also, the spoke wrench is not a NECESSITY, but it is nice to have. Well, let me clarify: It’s not a necessity to build a wheel. If you’re truing a wheel, you will need one (but that is a different guide).
Spokes come in different lengths! A lot of sites have “spoke calculators”, which you enter the rim and hub combo, and the specs for crosses and holes, and it pops out a number for which length you need. Don’t just “guess”. You will almost always guess wrong.
Another thing to keep by you is a water bottle or something to drink. If this is your first build, again, it might take you a while :P
If you’re building a front wheel, skip over the red text. If you’re building a rear wheel, read it. There’s not much different, but a few little things.
Remove the driver! It will be a REALLY annoying build (and impossible, depending on the size) if you leave it on there. If you have a freewheel, it has to come off. Removal tool needed for you. Local shop will probably be able to do it for a small fee.
1- grab a spoke, any spoke. Drop it through a hole, any hole. (It doesn’t matter if you start with drive or non-drive side).

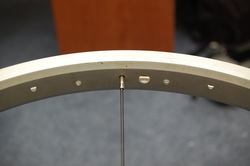
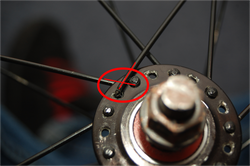
2- This is the first spoke to be attached to the rim. It’s not as easy as “pick a hole any hole”, and you’ll see why in a second. Something to note here is that the spoke holes on the rim are offset, if you look at them. Some are closer to one side, and some to the other. This corresponds to your hub. The spokes on the left side of the hub are laced to the left side of the rim. **If your rim is cross laced, then the left side of the hub is laced to the right side of the rim. Keep this in mind, as this is the only mention I will make of cross laced rims!**
Lay the rim down on your lap, so the spoke hole is directly across from you. An easy giveaway to find the valve hole if you cannot, look for the sticker of the company/name of the rim, etc. When that is found, look directly across the rim.
Use the hole to the left of the rim for this spoke. The thing to look for is the hub/spoke line up. The hole should be on the upper level (if the rim is lying flat). If you accidentally use the wrong one, just flip the rim over and it’ll be correct. :D
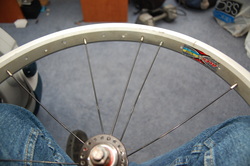
3- Drop a spoke downwards through every OTHER hole on the same side
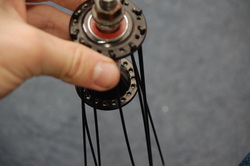
4- After all the spokes are in the hub, grab one next to the lead spoke (the spoke that is attached at the valve hole). Skip three (3) holes, and on the fourth (4), put the spoke in and fasten it down.

5- PAY ATTENTION. This step can screw you over if you do it wrong. Drop a spoke through a hole so that it hits the opposite flange plum. (that means straight up and down). You should now see that the flanges are actually offset, so the hole on one corresponds to the area between holes on the other. Drop the spoke through the hole so that it looks like the pictures below. If you’re looking at it from above, it should be to the left.

6- Trace that dropped spoke out to the rim, and attach it using the hole to the left of the spoke you used for reference.
7- Like you did with the other side, every other hole, skip 3, etc.
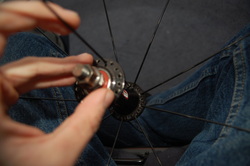
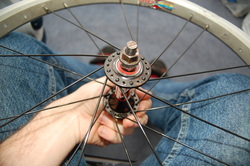
8- This is a weird step, but grab your hub and twist it. You’ll see any built up wheel has the spokes go off at an angle, not straight out (of course, there are straight gauge, but we’re not using those). The direction you spin it does not matter
Grab your driver and spin it. (as in, put it back on for this step) The direction DOES matter for a rear wheel. The hub should be spun in the direction of rotation from the chain. So, either know which way, or just grab the driver and give it a spin. The hub should go with it.
Grab your driver and spin it. (as in, put it back on for this step) The direction DOES matter for a rear wheel. The hub should be spun in the direction of rotation from the chain. So, either know which way, or just grab the driver and give it a spin. The hub should go with it.
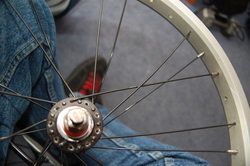
9- This is the moment you’ve ALL been waiting for! CROSS LACING! This step is actually really easy, but makes spokes go from an organized pattern, to an organized tangle. Grab the spoke, and put it through the opposite way of the other spokes.
Grab it, and rotate it in the OPPOSITE direction as the hub is rotated in the rim. You’ll see in the images below.
Grab it, and rotate it in the OPPOSITE direction as the hub is rotated in the rim. You’ll see in the images below.
It’s not as easy as just crossing over all the spokes and attaching it though, and this is where I have to differentiate between the #cross. But I’ll keep it easy.
I’ll do the first example with 3cross 36h (because that is the wheel I am building for this guide). Take the spoke and cross it over 2 spokes. That becomes 2 of the 3 crosses. The third cross is actually underneath. So, looking at it from above, you go “OVER, OVER, UNDER”, then secure the spoke in the hole. There should only be 2 holes where it ends up, so use the one on the same side as the flange the spoke is coming from.
On whatever cross number you use, it should go over all of the spokes, and then under the last. If you're doing a 2x lace, it would cross over one, then go under the next, before being secured.

HEY! By the way, THIS is a cross!
Repeat this around the whole rim. The best way to do this, in my opinion, is to do every fourth on one side, then do the same on the other. Then, go around and do the complete side of one, then the other. I do this simply to secure down each side before going around and doing the whole rim.
Just as a quick note, the side you did the first spoke on will cross in the opposite direction as the other side. If you saw the images above, that was the first side. This is the other side
Just as a quick note, the side you did the first spoke on will cross in the opposite direction as the other side. If you saw the images above, that was the first side. This is the other side
10- Do this all the way around.
Put the driver back on
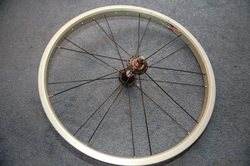
AND YOU’RE DONE! WOO! Your wheel is BUILT. If you tighten the spokes up a bit you’ll see the wheel start to look a little more like a wheel, as in the spokes will straighten out rather than looking all Dr. Seuss like.
As a few notes at the end. You’ll notice I never mentioned how tight the nipples should be. The average when building is about 5-7 rotations, sometimes a bit less. You shouldn’t need the spoke wrench, but I did end up using it a few times. I had a few nipples that my fingers could only do a rotation or two. DO NOT leave them like that! The spokes already have some decent stress on them. One or two rotations will slip out, and can damage your materials.
All the stuff I used is not new, at all. It’s old, and has been built up and torn down maybe 10 times, combining all the times I used it for practice, and guides in the past. Also, this guide took 2 builds, since the first build somehow got lost in the pictures. D:
It IS okay to bend spokes. I had them bending quite a bit. Just don’t bend them too much. If you let the tension go (from bending), and the spoke stays bent, then ditch it. Always order a good amount more. Whenever I do a 48, I order 55. When I do a 36, I order 45, etc. This allows you to bend 1 or 2 on accident, and replace those which break.
You CAN put this wheel on and ride for the front, or brakeless rear. However, it will be wobbly as hell. The wheel is built, but not trued. I will get a guide on truing out eventually (not in a big rush). However, I will add some links to a few at the bottom. The other option is to bring it to your local shop. Most shops charge about 8-12 for truing something like this, but upwards of 20-30 to build it. it’s easy to build, real easy. Just not as easy to true D: Support your local shops.
If you have any questions, leave them as a comment please.
Thanks for reading! Happy building!
 RSS Feed
